Nowadays, there are various platforms for websites. The platforms are varied according to business purpose. One of the platforms is Blogger. Blogger is the best platform for blogger. Blogger provides different tools for our blog. It makes our blog more attractive. Blogger also allows adding plugin to make our blog more interesting. Blogger provides different tools for making the blog more user-friendly. One of these tools is creating PWA. So, what is PWA? Let's explore.
Progressive Web Apps (PWA) are web applications that combine the best of the web and the best of apps. The concept has been around for a while, but it's becoming more important as the mobile web continues to grow. In this article, I'll walk you through the process of creating a Progressive Web App for your Blogger blog, all in a few easy steps.
1. What is Progressive Web App?
Progressive Web App, often referred to as PWA, is a term created by Google to describe web applications that are installable and work offline. PWAs combine features of regular websites and mobile applications. They are installable on devices, can work offline, and send notifications to the user. In other words, PWAs offer the best of both worlds. Users can access them through a web browser, and they will work even if the user is not connected to the internet.
Progressive Web Apps are experiences that combine the best of the web and mobile apps. They are useful, fast, and engaging, with low data usage and offline support. PWAs use modern web capabilities to deliver an app-like experience to users.
2. What are PWA Features ?
Progressive web apps offer a lot of features that are not available on traditional websites. Here are some of the key features: - Offline support: Once you've installed a progressive web app, it will work even when you're not connected to the internet. - Speed: Progressive web apps are designed to load quickly, even on slow networks. - Push notifications: PWA can send push notifications to your users, even when they're not using the app. - Install on home screen: Users can "install" PWAs on their home screen, just like traditional apps. - Easy updates: Progressive web apps are updated automatically, just like traditional apps.
3. Why is it important to have PWA ?
The benefits of using a PWA for your Blogger site are numerous. Not only do PWAs offer an engaging and smooth user experience, but they're also incredibly reliable. They can be accessed even when there's no internet connection, and they're easy to install—you can add them to your home screen with just a few taps. Plus, they load quickly and are search engine friendly. In short, PWAs are the perfect way to provide a superior user experience for your readers.
4. Advantages of a PWA ?
PWAs offer several advantages over traditional web apps and even native apps. First, they're discoverable. Because they're installed on the user's device, they can be launched from the home screen or app launcher just like any other app. They can also be added to the user's home screen on Android devices with a simple tap. Next, they're fast. They're cached on the user's device so they load quickly, even in areas with slow or nonexistent internet connections. Finally, they're reliable. They work offline and even when the user's device is in Airplane Mode.
5. What is The Benefit Of Using PWA?
Progressive Web Apps (PWA) are experiences that combine the best of the web and mobile apps. They are built with modern web technologies and standards, and they make use of features that are available in most modern browsers. When a user visits a PWA, the app is able to detect this and provides an experience that is tailored for the web. This includes using the latest web APIs, which allow PWA to do things like use the device's camera, access the user's location, and more. In many cases, PWA can offer an app-like experience even when the user is not using a mobile device.
6. How To Make PWA ?
In this tutorial, we'll show you how to make a Progressive Web App for your Blogger blog. 3. How To Make PWA? To make a PWA, you'll need to create a manifest file and an icon. The manifest file tells the browser what to do when a user visits your site. The icon is the image that will be displayed on the user's device when your site is added to their home screen. You can create a manifest file and icon using a tool like Webpack or a code editor.
7. Where To Find More Information On PWA?
PWAs are a popular web development trend at the moment. They offer many benefits over traditional websites, such as faster loading times, improved user experience, and increased conversions. However, they can be quite complex to develop. If you're not familiar with the term, Progressive Web Apps are websites that are built using modern web technologies and that offer the same features as traditional apps. They're installed on the user's device like a regular app, but they can also be accessed through a web browser. For more information on PWAs, check out this article from Google.
8. What's the difference between Native App vs Progressive Web App (PWA) ?
Progressive web apps are web apps that load like regular websites but offer some features of native apps. They're designed to work offline, and they can be added to your device's home screen just like a native app. One of the main benefits of PWAs is that they're much cheaper and quicker to develop than native apps. They also have the advantage of being accessible to a much wider range of users, since they don't require the download of a separate app. So why would you choose to develop a PWA rather than a native app? Well, PWAs offer a number of benefits that native apps can't match, such as increased speed, reliability and engagement.
9. How to Make Progressive Web App (PWA) for Blogger :-
Creating a Progressive Web App (PWA) on your Blogger site is a great way to improve user experience, boost engagement, and increase Traffic. In this article, we'll show you how to make a PWA on Blogger sites in some easy steps.
 |
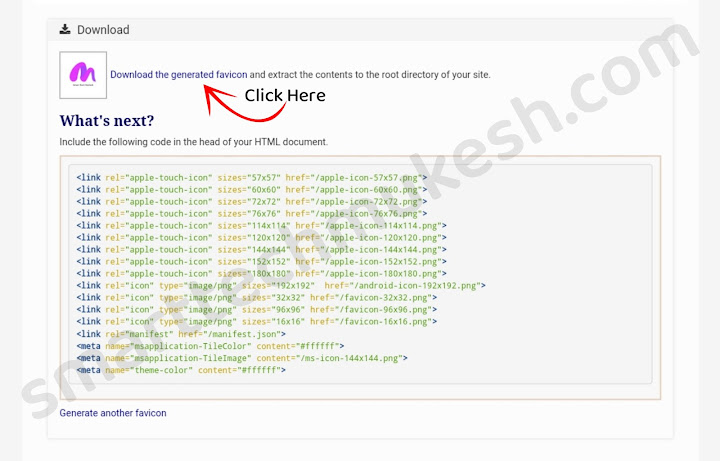
| Example : Click on Download The Generated Icon |
 |
| Example :- Delete The Marked File |
<head> Tag.<meta content='#6200ee' name='theme-color' />
<meta content='#6200ee' name='msapplication-navbutton-color' />
<meta content='#6200ee' name='apple-mobile-web-app-status-bar-style' />
<meta content='true' name='apple-mobile-web-app-capable' />
<link href="/favicon.ico" rel='icon' type='image/x-icon' />
<link href="/favicon.ico" rel='shortcut icon' type='image/x-icon' />
<link href="/main/apple-icon-57x57.png" rel='apple-touch-icon' sizes='57x57' />
<link href="/main/apple-icon-60x60.png" rel='apple-touch-icon' sizes='60x60' />
<link href="/main/apple-icon-72x72.png" rel='apple-touch-icon' sizes='72x72' />
<link href="/main/apple-icon-76x76.png" rel='apple-touch-icon' sizes='76x76' />
<link href="/main/apple-icon-114x114.png" rel='apple-touch-icon' sizes='114x114' />
<link href="/main/apple-icon-120x120.png" rel='apple-touch-icon' sizes='120x120' />
<link href="/main/apple-icon-114x114.png" rel='apple-touch-icon' sizes='144x144' />
<link href="/main/apple-icon-152x152.png" rel='apple-touch-icon' sizes='152x152' />
<link href="/main/apple-icon-180x180.png" rel='apple-touch-icon' sizes='180x180' />
<link href="/main/android-icon-192x192.png" rel='icon' sizes='192x192' type='image/png' />
<link href="/main/favicon-32x32.png" rel='icon' sizes='32x32' type='image/png' />
<link href="/main/favicon-96x96.png" rel='icon' sizes='96x96' type='image/png' />
<link href="/main/favicon-16x16.png" rel='icon' sizes='16x16' type='image/png' />
<meta content='#007fa0' name='msapplication-TileColor' />
<meta content='/main/ms-icon-144x144.png' name='msapplication-TileImage' />
<link href="/manifest.json" rel='manifest' />
 |
| Example :- Create Repository on Github Like This. |
Read Full Tutorial About :- How to host HTML, Css and JavaScript on GitHub ?
Add Repository Title For Example :- stm-icon
Note :- Must Be Your Website on Cloudflare Required. This is Tutorial Only For Custom Domain User, Not Blogspot.Com Subdomain User.
 |
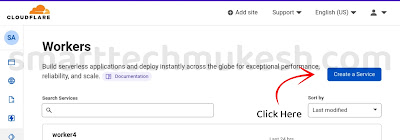
| Example :- Create a Service on Cloudflare Workers |
 |
| Example : How to Create Worker / Service on Cloudflare |
Make Sure Add Worker Name Example :- stm-worker1.
- stm-worker2
- stm-worker3
- stm-worker4
 |
| Example :- Click on Quik Edit. |
 |
| Example :- How to Edit Workers / Service on Cloudflare |
stm-worker1 Code
const html = `<!DOCTYPE html>

<head>

<meta content='width=device-width,minimum-scale=1,initial-scale=1' name='viewport'/>

</head>

<body style=" background: #fff; ">

<div style=" margin: 0 auto; max-width: 1000px; text-align: center; padding-top: 100px; color: #111; ">

<div style=" font-family: Arial,Helvetica,sans-serif; font-size: 50px; ">Oops, You're Offline!</div>

<div style=" font-family: Georgia,'Times New Roman',serif; font-size: 20px; padding-top: 40px; ">It looks like your network connection isn't working right now.</div>

</div> </body>`

async function handleRequest(request) {

  return new Response(html, {

    headers: {

      "content-type": "text/html;charset=UTF-8",

    },

  })

}

addEventListener("fetch", event => {

  return event.respondWith(handleRequest(event.request))

})
Cloudflare Not Supported Any Android Phone Default Keyword. Make Sure You Have Laptop Keyword.
Remainning Services Code Here :-
stm-worker2 Codes.const js = `
importScripts('https://storage.googleapis.com/workbox-cdn/releases/5.1.2/workbox-sw.js');
if (workbox) {
workbox.core.skipWaiting();
workbox.core.clientsClaim();
workbox.core.setCacheNameDetails({
prefix: 'thn-sw',
suffix: 'v22',
precache: 'install-time',
runtime: 'run-time'
});
const FALLBACK_HTML_URL = '/offline.html';
const version = workbox.core.cacheNames.suffix;
workbox.precaching.precacheAndRoute([{url: FALLBACK_HTML_URL, revision: null},{url: '/manifest.json', revision: null},{url: '/favicon.ico', revision: null}]);
workbox.routing.setDefaultHandler(new workbox.strategies.NetworkOnly());
workbox.routing.registerRoute(
new RegExp('.(?:css|js|png|gif|jpg|svg|ico)$'),
new workbox.strategies.CacheFirst({
cacheName: 'images-js-css-' + version,
plugins: [
new workbox.expiration.ExpirationPlugin({
maxAgeSeconds: 60 * 24 * 60 * 60,
maxEntries:200,
purgeOnQuotaError: true
})
],
}),'GET'
);
workbox.routing.setCatchHandler(({event}) => {
switch (event.request.destination) {
case 'document':
return caches.match(FALLBACK_HTML_URL);
break;
default:
return Response.error();
}
});
self.addEventListener('activate', function(event) {
event.waitUntil (
caches
.keys()
.then(keys => keys.filter(key => !key.endsWith(version)))
.then(keys => Promise.all(keys.map(key => caches.delete(key))))
);
});
}
else {
console.log('Boo! Workbox didnt load ');
}
`
async function handleRequest(request) {
return new Response(js, {
headers: {
"content-type": "application/javascript;charset=UTF-8",
},
})
}
addEventListener("fetch", event => {
return event.respondWith(handleRequest(event.request))
})addEventListener("fetch", event => {
event.respondWith(handleRequest(event))
})
//const BUCKET_NAME = "main"
const BUCKET_URL = `https://cdn.statically.io/gh/smarttechmukesh/mukeshwidgets-icon`
async function serveAsset(event) {
const url = new URL(event.request.url)
const cache = caches.default
let response = await cache.match(event.request)
if (!response) {
response = await fetch(`${BUCKET_URL}${url.pathname}`)
const headers = { "cache-control": "public, max-age=14400" }
response = new Response(response.body, { ...response, headers })
event.waitUntil(cache.put(event.request, response.clone()))
}
return response
}
async function handleRequest(event) {
if (event.request.method === "GET") {
let response = await serveAsset(event)
if (response.status > 399) {
response = new Response(response.statusText, { status: response.status })
}
return response
} else {
return new Response("Method not allowed", { status: 405 })
}
}addEventListener("fetch", event => {
event.respondWith(handleRequest(event))
})
//const BUCKET_NAME = "main"
const BUCKET_URL = `https://cdn.statically.io/gh/smarttechmukesh/mukeshwidgets-icon`
async function serveAsset(event) {
const url = new URL(event.request.url)
const cache = caches.default
let response = await cache.match(event.request)
if (!response) {
response = await fetch(`${BUCKET_URL}${url.pathname}`)
const headers = { "cache-control": "public, max-age=14400" }
response = new Response(response.body, { ...response, headers })
event.waitUntil(cache.put(event.request, response.clone()))
}
return response
}
async function handleRequest(event) {
if (event.request.method === "GET") {
let response = await serveAsset(event)
if (response.status > 399) {
response = new Response(response.statusText, { status: response.status })
}
return response
} else {
return new Response("Method not allowed", { status: 405 })
}
}Marked "smarttechmukesh" Replace With Your Github Username.
Marked "mukeshwidgets-icon" Replace With Your Recently Created Repository Name For Github.
stm-worker4 Codes.addEventListener("fetch", event => {
const data = {
name: "Mukesh Widgets",
short_name: "Mukesh Widgets",
display: "standalone",
prefer_related_applications: false,
start_url: ".",
scope: "\/",
background_color: "#fff",
theme_color: "#6200ee",
description: "Mukesh Widgets is a site that provides the best widgets with a wide variety of styles for the Blogger platform, complete with very easy installation tutorials.",
icons:[
{
src: "\/main\/android-icon-36x36.png",
sizes: "36x36",
type: "image\/png",
density: "0.75",
purpose: "any maskable"
},
{
src: "\/main\/android-icon-48x48.png",
sizes: "48x48",
type: "image\/png",
density: "1.0",
purpose: "any maskable"
},
{
src: "\/main\/android-icon-72x72.png",
sizes: "72x72",
type: "image\/png",
density: "1.5",
purpose: "any maskable"
},
{
src: "\/main\/android-icon-96x96.png",
sizes: "96x96",
type: "image\/png",
density: "2.0",
purpose: "any maskable"
},
{
src: "\/main\/apple-icon-144x144.png",
sizes: "144x144",
type: "image\/png",
density: "3.0",
purpose: "any maskable"
},
{
src: "\/main\/android-icon-192x192.png",
sizes: "192x192",
type: "image\/png",
density: "4.0",
purpose: "any maskable"
},
{
src: "\/main\/android-icon-512x512.png",
sizes: "512x512",
type: "image/png",
density: "4.0",
purpose: "any maskable"
},
],
"serviceworker": {
"src": "/sw.js"
}
}
const json = JSON.stringify(data, null, 2)
return event.respondWith(
new Response(json, {
headers: {
"content-type": "application/json;charset=UTF-8"
}
})
)
})Replace All Marked Part According To You.
 |
| Example :- Click on Add Route |
 |
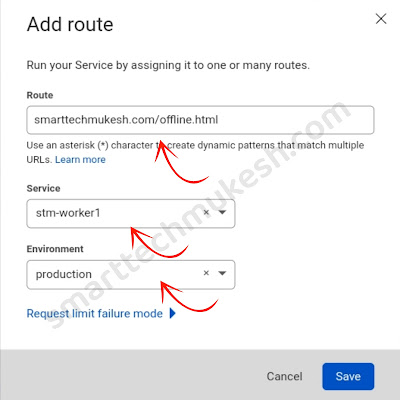
| Example :- Add Route and Service, Environment Like This |
| No | Service | Environment | Route |
|---|---|---|---|
| 1 | stm-worker1 | production | www.example.com/offline.html |
| 2 | stm-worker2 | production | www.example.com/sw.js |
| 3 | stm-worker3 | production | www.example.com/main/* |
| 4 | stm-worker4 | production | www.example.com/manifest.json |
</body>.<script type='text/javascript'>
//<![CDATA[
if('serviceWorker' in navigator) {
navigator.serviceWorker
.register('/sw.js')
.then(function() { console.log("Service Worker Registered"); });
}
//]]>
</script>Conclusion :-
We have mentioned the best and best way to make PWA. Many ways have been told by people on the internet to make PWA, but most of the methods are not working at the moment.
In this post I have shared with you all how to make Progressive Web App (PWA) on Blogger. I hope you all liked this post very much. If you have any problem related to this post then you can tell us by commenting. If you did not understand this post, then we have also made a video tutorial which is available on YouTube channel which you can watch and understand. Thank you for visiting our website.
Refrence :
Www.SmartTechMukesh.Com


Thanks for you 👍
0 Comments